Version 8.0.0.18

  • Reveal special colors or custom layers(WR_White,WR_Spot1,WR_SPot2 etc)
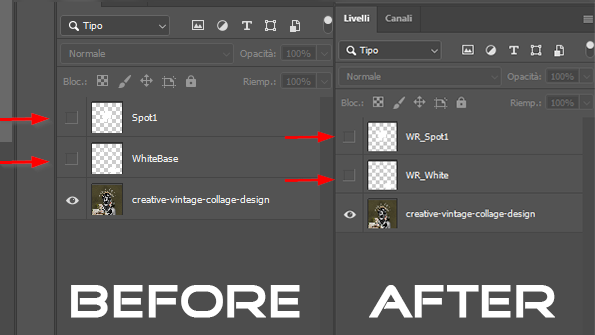
This screenshot captures a before-and-after scenario within a design or photo-editing software's layers panel. Initially, in the "BEFORE" state, we see a list of layers each serving a specific function in the composition. There’s a 'Spot1' layer, which might be for spot color application, indicated by the checkerboard pattern that often denotes transparency. Beneath it, the 'WhiteBase' layer suggests a foundational layer, possibly for a color base in printing. The last layer, with a preview image, is named 'creative-vintage-collage-design', indicating the primary artistic element of the project.  After some modifications, as shown in the "AFTER" section, the first two layers have been renamed: 'Spot1' is now 'WR_Spot1', and 'WhiteBase' has been changed to 'WR_White'. These adjustments reflect a standardized naming convention, which could be a necessary step for further processing. The primary design layer remains unaltered in name, suggesting that the main focus was on updating the technical layers for compatibility or organizational reasons, possibly related to printing or file management protocols. The red arrows accentuate the changes, directing the viewer's attention to the layers that have been renamed. This meticulous approach is typical in digital workflows to ensure that every layer is properly identified and managed for the subsequent stages of production.

This function, previously introduced in WhiteRIP 8, allows you to customize special colors directly from the layers of any graphic program, such as Spot or customized WhiteBase. With this update, the “names” have been changed to enable this feature:

  • To use it on the WhiteBase, you need to name the layer as WR_White.
  • To use it on the Spot channel, you need to name the layer as WR_Spot1 or WR_Spot2 (only in the case of two special colors).

N.B For a short period of adaptation, WhiteRIP will automatically recognize the special channels from the .PSD files which are named as “Spot1” and “WhiteBase”.

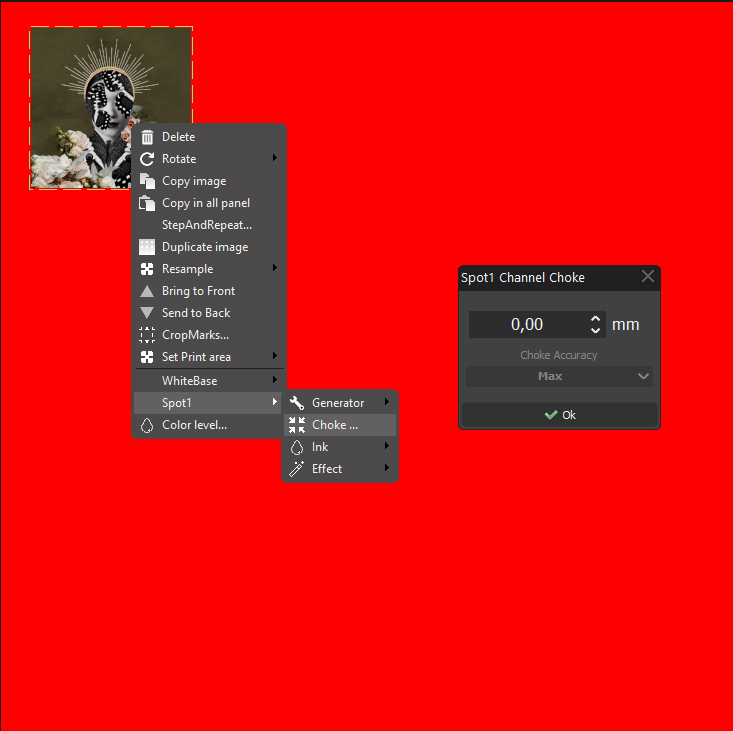
  • Choke Spot available for single image
In the image, we see a glimpse of a graphical user interface from a design or printing software. The background is a striking red, and there's a contextual menu open with several options related to image manipulation. Options like 'Delete', 'Rotate', 'Copy image', 'StepAndRepeat...', 'Duplicate image', 'Resample', 'Bring to Front', 'Send to Back', 'CropMarks...', and 'Set Print area' indicate a sophisticated set of tools for detailed image and print control.  Below this menu, there's a nested submenu next to 'Spot1', which includes 'Generator', 'Choke...', 'Ink', and 'Effect', suggesting advanced customization for the 'Spot1' layer, possibly in preparation for specialized printing techniques.  To the right, there is a small dialog box titled 'Spot1 Channel Choke' with an input field set at '0,00 mm' and a dropdown menu for 'Choke Accuracy' set to 'Max'. This implies that the software is capable of applying a choke to the spot channel, a technique used in printing to adjust the spread of ink or to compensate for registration issues between different color layers.  The overall image conveys a part of the process in print production where precision adjustments are made to the artwork before final output. The red arrows in the contextual menu point to specific features or tools, possibly for instructional purposes or to highlight areas of focus for the user.

WhiteRIP now offers the possibility to use the “Choke” function even on individual images. Just right click on the desired image, select “Spot1” and finally in the “Choke” menu you can set the desired offset.

  • General Fix

Includes minor updates to optimize

Leave a Reply

Your email address will not be published. Required fields are marked *